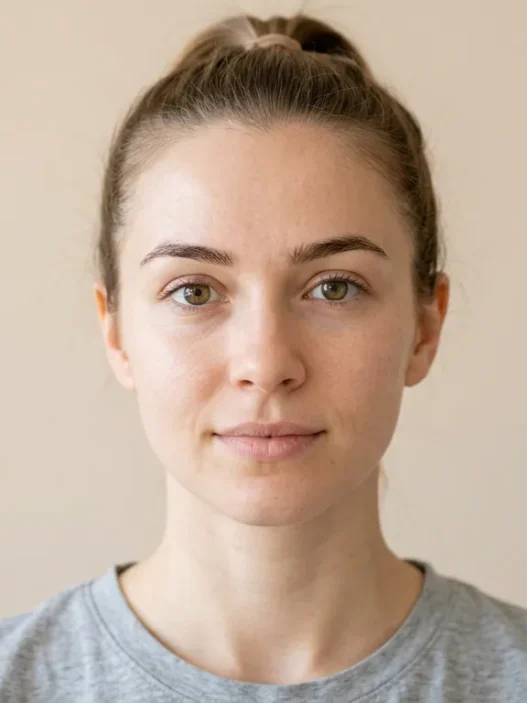


I used to think baddie makeup was just about going bold with everything. Throw on some dark liner, heavy contour, and call it a day. But after countless failed attempts that left me looking more like I got into a fight with my makeup bag, I realized there’s actual technique behind that effortlessly fierce look. The baddie aesthetic isn’t just about intensity—it’s about precision, placement, and knowing when to push boundaries.
What You’ll Master in This Deep Dive
- Understanding the Fundamentals
- The Three Variations Worth Knowing
- Step 1: Creating the Perfect Base Canvas
- Step 2: Sculpting with Strategic Contour
- Step 3: Building Bold Eye Drama
- Step 4: Perfecting the Sharp Wing
- Step 5: Adding Dimension and Glow
- Step 6: Finishing with Statement Lips
- Common Mistakes at Each Stage
- Taking It Further
Understanding the Fundamentals
The baddie look centers on three non-negotiable elements: flawless base work, sharp geometric lines, and strategic color placement. It’s not about covering your face in every bold product you own. Instead, it’s architectural. Think of your face as a canvas where you’re creating deliberate shadows and highlights to enhance your natural bone structure.
What sets baddie makeup apart from other bold themed makeup looks is the emphasis on clean execution. Every line needs purpose. Every blend needs intention. The moment something looks messy or unfinished, you’ve lost that polished edge that defines the aesthetic.
I learned this the hard way when I first attempted the look for a night out. I thought throwing on dramatic everything would work. Wrong. The result was muddy, overwhelming, and honestly kind of scary. The key insight? Baddie makeup requires restraint in some areas to let other features truly pop.
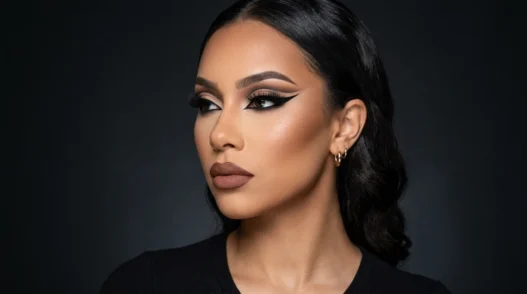
The Three Variations Worth Knowing
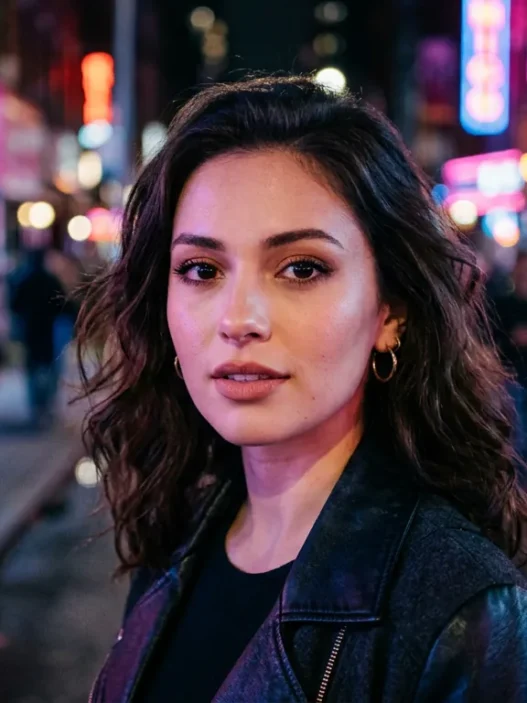
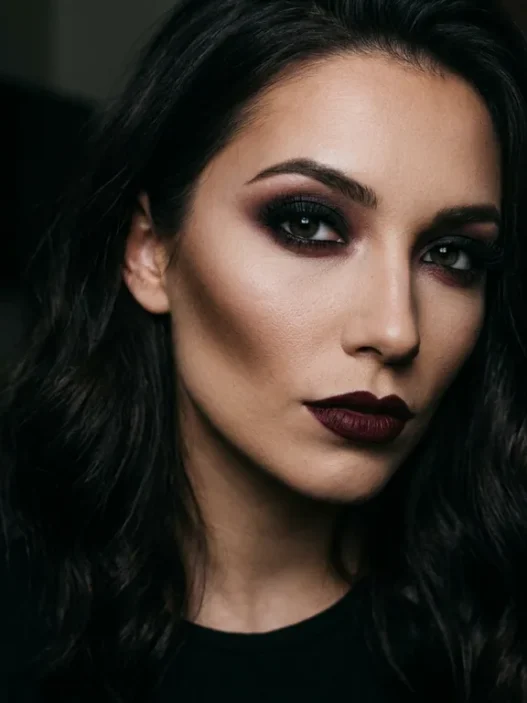
There are three distinct approaches within the baddie framework, and understanding these helps you choose the right direction for your face shape and comfort level. The Soft Baddie focuses on warm browns and bronze tones with subtle drama. The Classic Baddie goes full intensity with sharp black liner and bold lips. The Editorial Baddie experiments with unconventional colors while maintaining that structured foundation.
For this tutorial, we’re focusing on the Classic Baddie because it teaches you every fundamental technique. Once you master this, adapting to the other variations becomes intuitive. You’ll understand how to modify intensity, swap colors, and adjust placement based on your personal style preferences.
The classic version also photographs beautifully, which matters if you’re planning to document your look. The high contrast elements read well in photos, and the structured approach holds up under various lighting conditions.
What You’ll Need
Before we dive into the step-by-step process, let’s gather everything. I’m not going to lie and say you need a massive kit, but certain tools make this significantly easier:
- Full-coverage foundation (one shade lighter than your skin tone for mixing)
- Concealer (2-3 shades lighter than your foundation)
- Contour powder or cream (cool-toned, not warm bronzer)
- Black gel or liquid eyeliner
- Neutral eyeshadow palette with deep browns and blacks
- False lashes or dramatic mascara
- Matte liquid lipstick in your chosen statement color
- Dense flat brush for cut creases
- Small angled brush for precise liner work
- Beauty blender for seamless blending
- Setting powder and spray
The brush quality matters more than you might think. A good flat brush can carve clean lines that cheaper alternatives just can’t achieve. Don’t skimp on the liner brush either—precision is everything for this look.
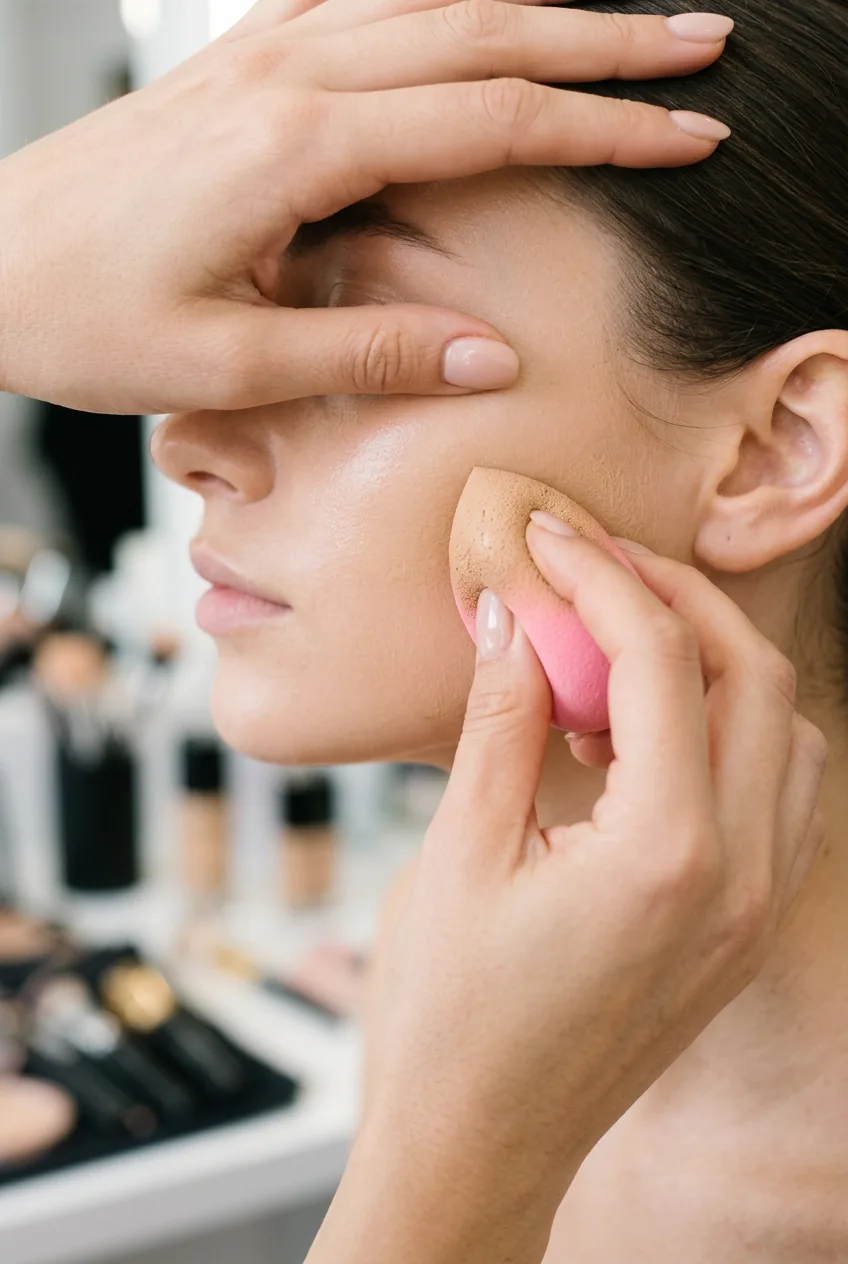
Step 1: Creating the Perfect Base Canvas
Your base needs to be absolutely flawless because every other element builds on this foundation. Start with a primer that grips makeup—this isn’t the time for a subtle, natural base. You want full coverage that won’t budge.
Apply your foundation with a damp beauty blender, building coverage gradually. Here’s where it gets strategic: I mix my regular shade with a slightly lighter foundation to create a base that’s perfect for later highlighting and contouring. This gives you more dimensional range to work with.
Don’t forget your neck and chest if you’re wearing anything low-cut. The baddie look is all about that seamless, camera-ready finish. Set everything with a light dusting of translucent powder, but don’t go heavy yet—we need some tackiness for the contour to grip properly.
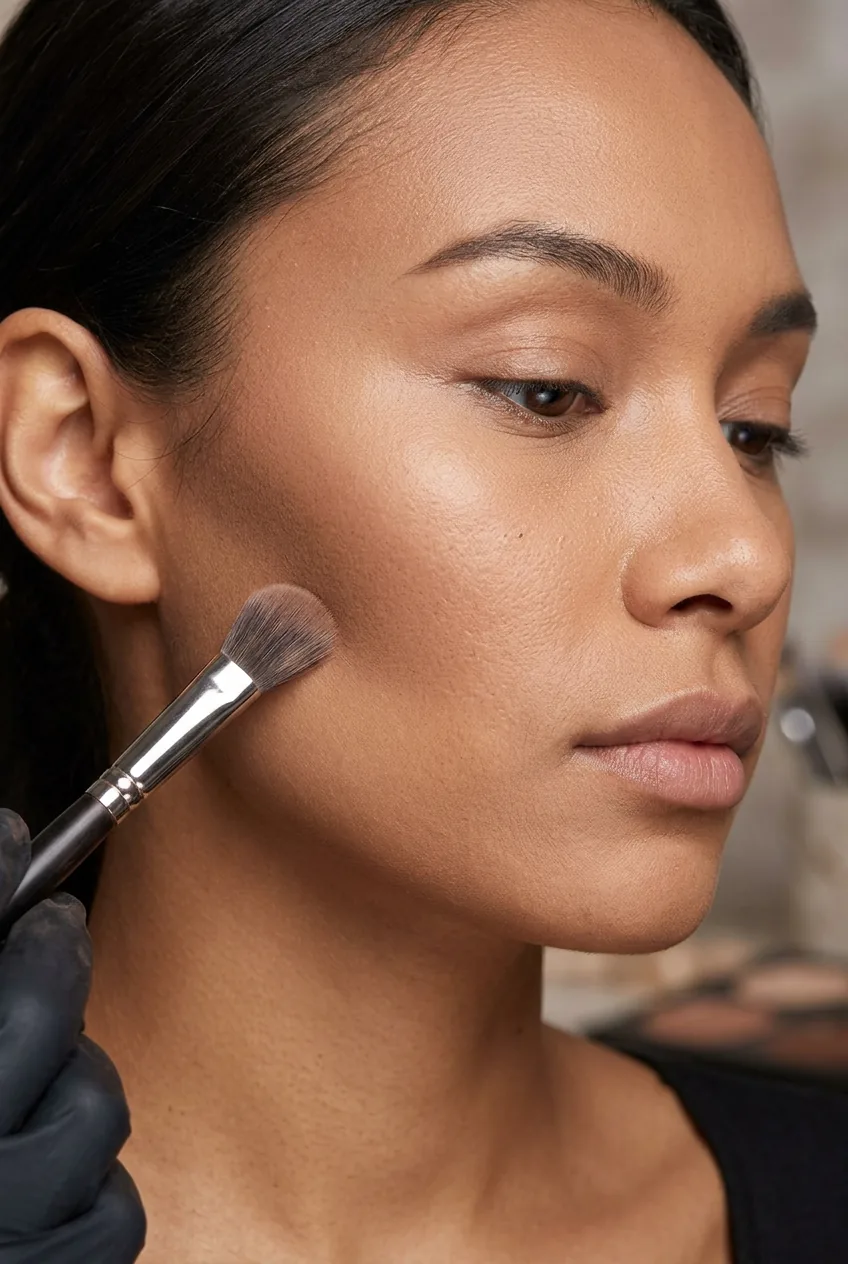
Step 2: Sculpting with Strategic Contour
This is where the magic happens. Baddie contouring goes beyond basic cheekbone definition. You’re creating an entirely new facial architecture. Start by mapping your face—identify the hollows of your cheeks, the sides of your nose, your temples, and your jawline.
Using a cool-toned contour shade (never warm bronzer), begin with the cheekbones. The key is placing the contour higher than you think—almost at the bottom of your eye socket. This creates that lifted, sculpted effect that’s signature to the look.
For your nose, draw two precise lines down the sides, making them slightly closer together than your natural nose width. This isn’t about looking natural—it’s about creating a sharp, defined nose that photographs beautifully. Blend carefully with a small, dense brush to avoid muddiness.
The jawline contour extends from your ear down to your chin, creating that coveted sharp jaw effect. Many people stop at the jawbone, but extending slightly under the chin eliminates any softness and maintains that structured look from every angle.
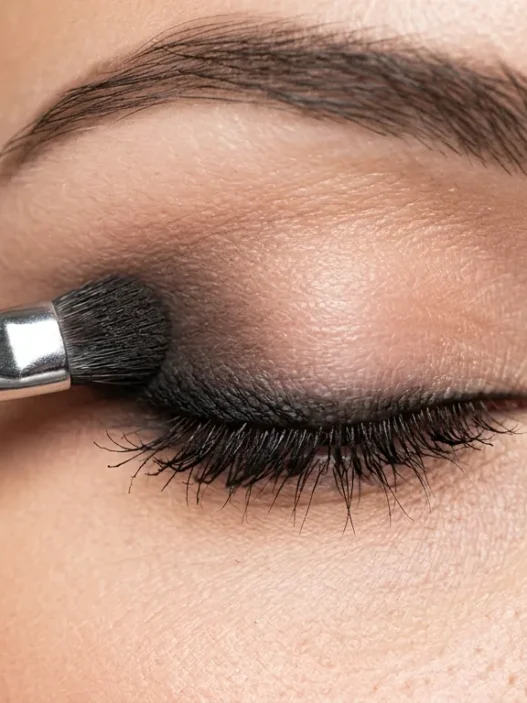
Step 3: Building Bold Eye Drama
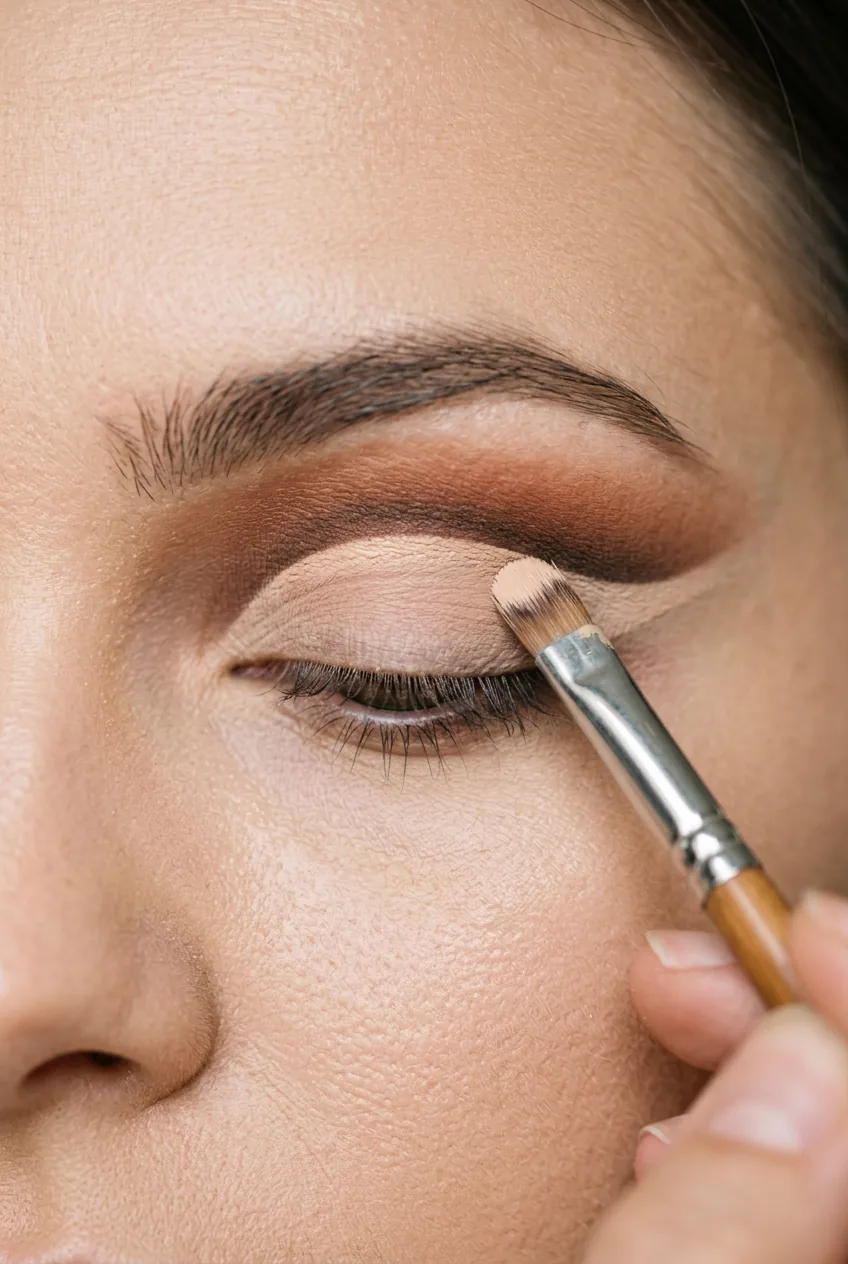
The eyes are where you can really push boundaries, but it starts with precision technique. Begin by setting your eyelids with powder—this prevents creasing and gives you a stable base for building color intensity.
Create a sharp cut crease using concealer. This technique involves drawing a precise line above your natural crease and blending upward to create a clean division between your lid and the dramatic shadow above. Use a flat brush to carve this line—the sharper, the better.
Start building your dark shadow above the cut crease line. I prefer using deep browns before moving to black because they’re more forgiving and easier to blend. The goal is creating a gradient that’s intense but not muddy. Pack the darkest color at the outer corner and blend inward and upward.
The lower lash line gets similar treatment but with more restraint. Use the same dark shades to line the bottom, connecting with your upper eye look. This creates that sultry, intense gaze that’s central to the baddie aesthetic. Just like the techniques you’d see in more dark feminine makeup approaches, the eyes become the focal point through strategic shadow placement.
Step 4: Perfecting the Sharp Wing
The winged liner can make or break your entire look. This isn’t about subtle enhancement—you want a graphic, architectural wing that extends the eye shape dramatically. Start by determining your wing angle using the outer corner of your nose as a guide.
I used to draw my wings freehand and wonder why they never matched. The game-changer was using tape as a guide. It sounds basic, but it creates that perfect sharp angle every single time. Place the tape from your lower lash line angling toward the end of your eyebrow, draw your line, then remove the tape for an instantly perfect wing.
Make your wing substantial—baddie liner isn’t subtle. The wing should extend well beyond your natural eye shape and connect seamlessly with your upper lash line. Use a high-quality gel or liquid liner that won’t budge once it sets.
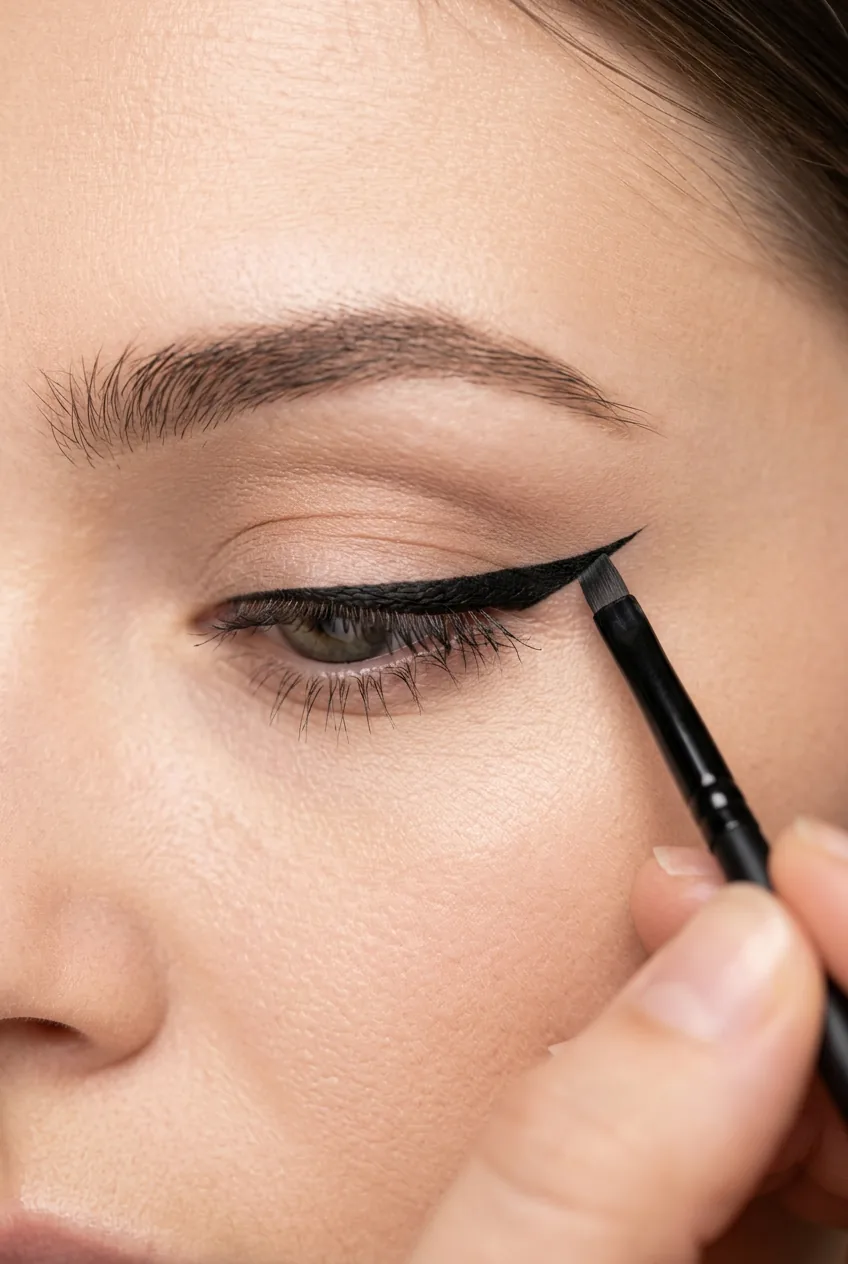
Don’t forget to line your waterline with black liner. This makes your lashes appear thicker and creates that intense, sultry gaze. It might feel uncomfortable at first, but it’s essential for the complete baddie eye.
Watch This Wing Technique in Action
Step 5: Adding Dimension and Glow
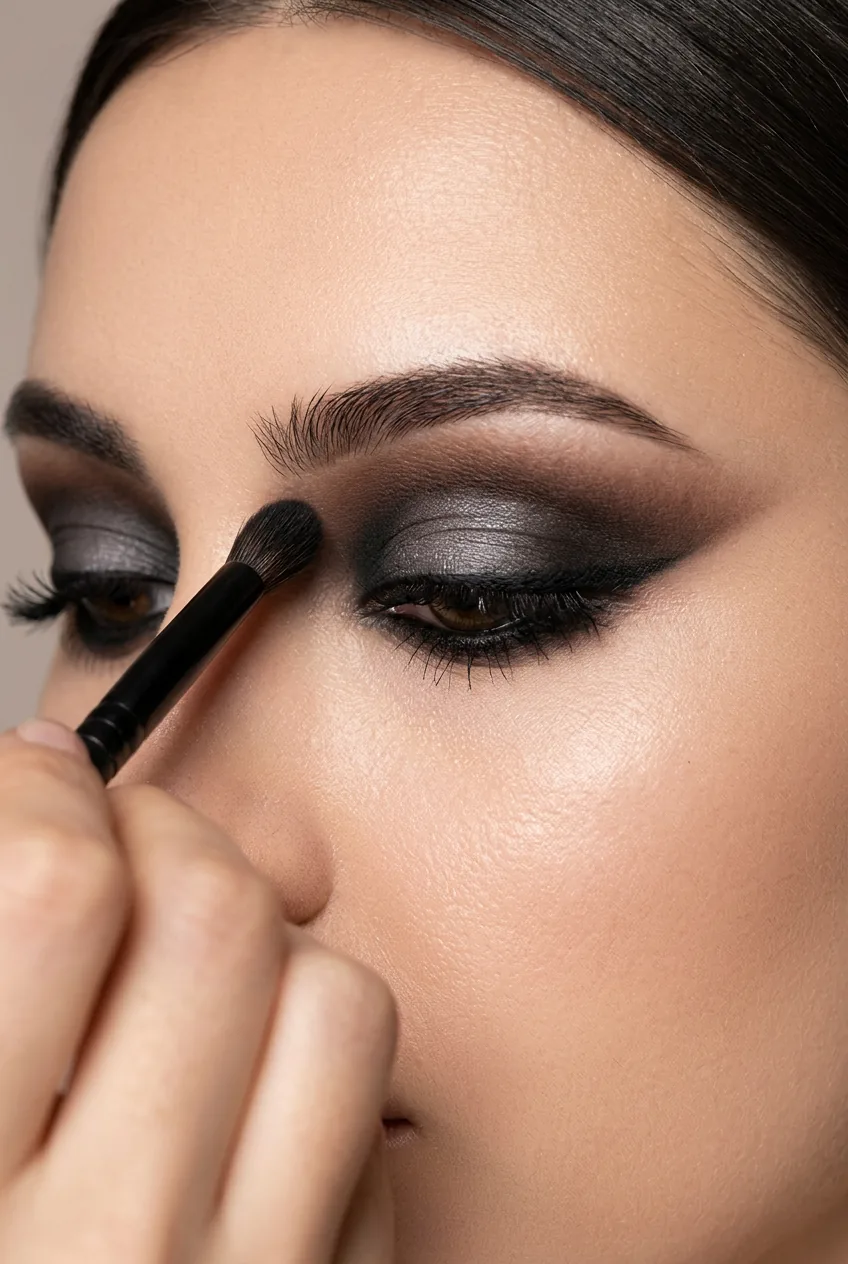
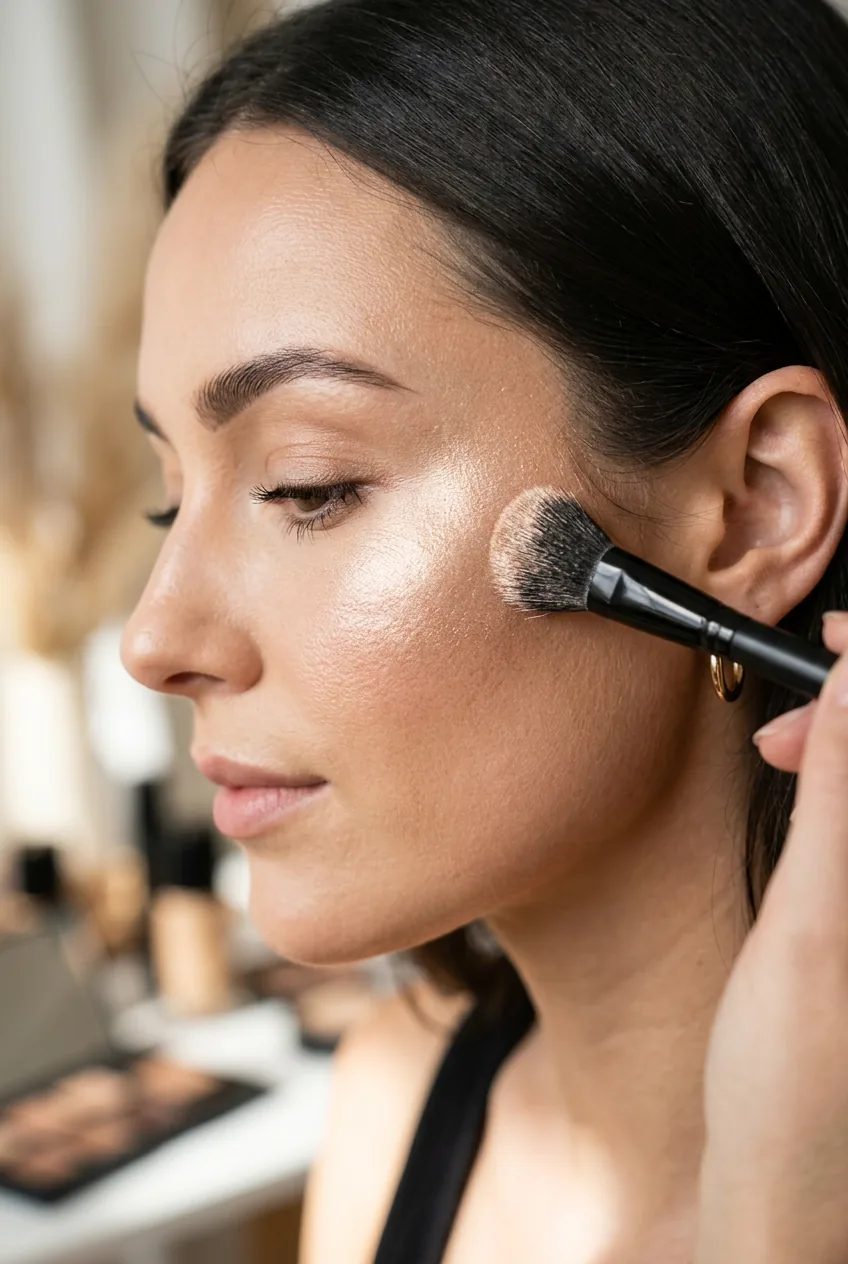
Now we bring everything to life with strategic highlighting. This isn’t about natural-looking radiance—you want deliberate, almost metallic highlights that catch light dramatically. Focus on the highest points: bridge of your nose, tops of cheekbones, center of your forehead, and your cupid’s bow.
Use a highlighter that’s significantly lighter than your skin tone, almost white-based. Apply with a small, dense brush for precision. The goal is creating points of light that enhance your newly sculpted features. Don’t blend too much—you want these highlights to sit on top of your base, not disappear into it.
Add a touch of highlight to your inner corners and just under the brow bone to make your eyes appear larger and more awake. This step ties together all your eye work and makes the dramatic shadows even more impactful.
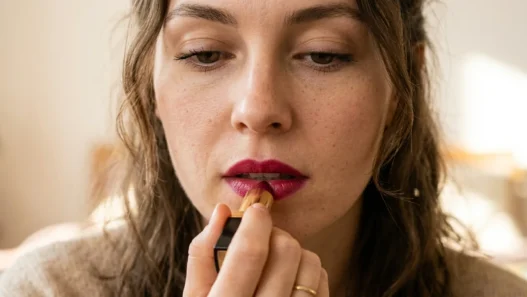
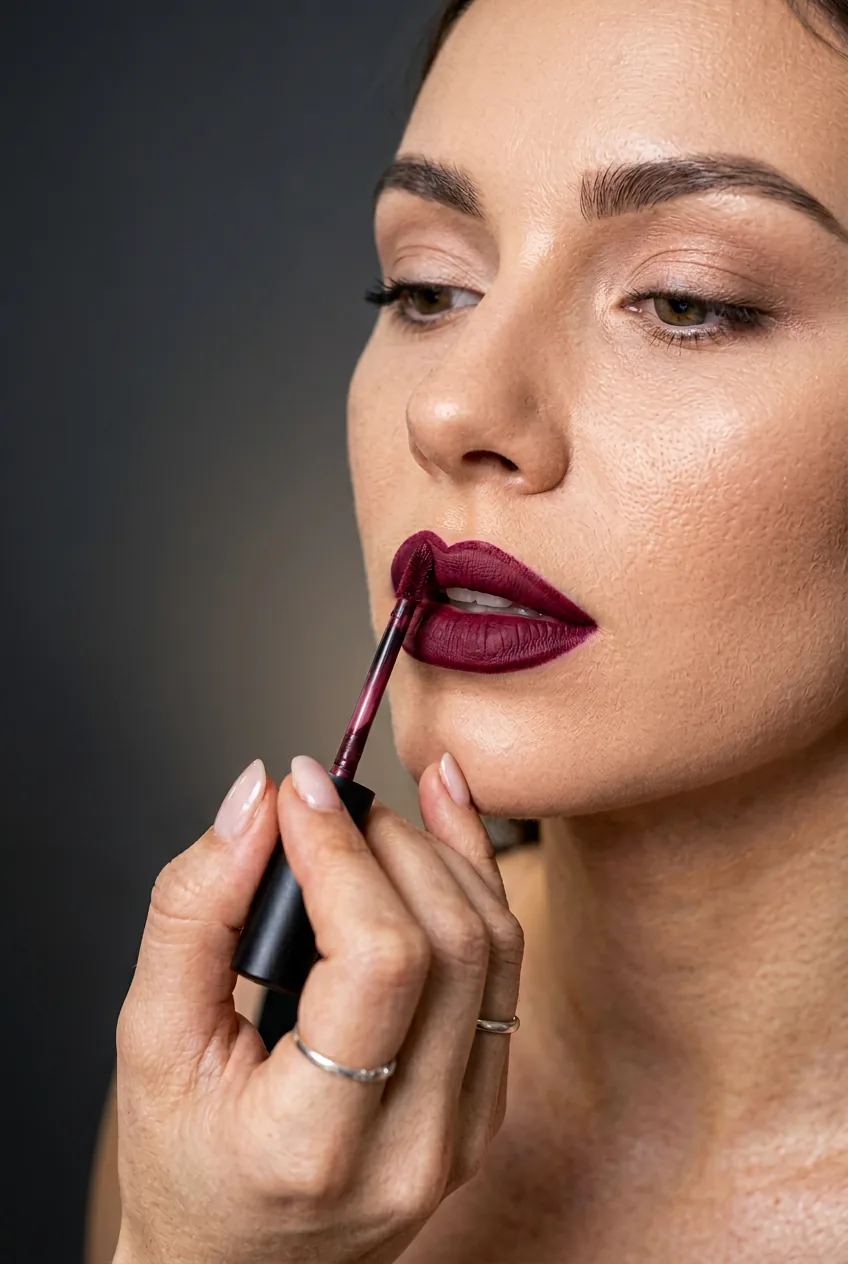
Step 6: Finishing with Statement Lips
Your lips need to complement, not compete with, your dramatic eyes. Line your lips with a precise liner, slightly overdrawing for fuller-looking lips. The baddie lip is usually matte and bold—think deep reds, rich browns, or even dramatic blacks depending on your color scheme.
Apply your liquid lipstick in thin layers, building up opacity gradually. This prevents that thick, uncomfortable feeling while ensuring the color stays true and lasts all night. Blot between layers with tissue to set each application.
For extra precision, clean up the edges with concealer on a small brush. This creates that sharp, defined lip line that’s essential to the polished baddie aesthetic. The lips should look like they were drawn on, not naturally occurring.
Set everything with a final mist of setting spray. Hold the bottle arm’s length away and spray in an X pattern across your face. This locks everything in place and helps your look last through whatever the night brings.
Common Mistakes at Each Stage
The biggest mistake I see is rushing the base. People want to jump to the fun dramatic parts, but if your foundation isn’t perfect, everything else will look sloppy. Take time with each layer and let products set before moving on.
Another common error is using warm-toned products for contouring. Baddie makeup relies on cool tones to create realistic shadows. Warm bronzers just make you look muddy, not sculpted. Invest in a proper contour shade that’s genuinely cool-toned.
With eye makeup, the biggest issue is blending too much. Yes, you want smooth transitions, but you also need to maintain the intensity and definition that makes the look dramatic. Professional techniques can help you understand when to blend and when to leave sharp lines intact.
Many people also place their contour too low on their cheeks. The baddie look requires higher placement than traditional contouring. If you follow standard placement rules, you’ll miss that lifted, sculpted effect that’s signature to this style.
Taking It Further
Once you’ve mastered this classic baddie look, there are endless ways to customize and evolve it. Experiment with different color stories—maybe deep purples instead of browns, or incorporate unexpected pops of color while maintaining the structured foundation.
Consider the occasions where you’ll wear this look. The full intensity might be perfect for evening events, but you can dial down certain elements for daytime versions. Maybe softer contour but maintain the sharp liner, or keep the dramatic eyes but opt for a nude lip.
The techniques you’ve learned here translate to other dramatic makeup styles too. Understanding how to create clean lines and build intensity systematically will improve all your makeup application. Similar to how structured makeup methods build skills progressively, mastering baddie techniques creates a foundation for any bold look you want to attempt.
Document your looks as you practice. Taking photos helps you see what works and what needs adjustment. The baddie aesthetic is meant to be camera-ready, so if it looks good in photos, you’ve nailed the technique.
Longevity tips become crucial when you’re investing this much time in application. You want your masterpiece to last all night without constant touch-ups.
Questions I Get About This Look
Can I do baddie makeup with drugstore products?
Absolutely. The technique matters more than the price point. Focus on finding products with good pigmentation and staying power. Many drugstore brands now offer excellent liquid liners and matte lipsticks that work perfectly for this look.
How long does it take to apply once you know what you’re doing?
With practice, about 45 minutes to an hour. The precision elements take time, especially the cut crease and sharp liner. Don’t rush—it’s better to take your time and get clean lines than to hurry and end up with a sloppy result.
What if I mess up the winged liner?
Use a flat brush dipped in micellar water to gently correct mistakes. For major fixes, remove the liner completely and start over. It’s frustrating, but trying to fix a crooked wing usually makes it worse. Practice the wing shape with eyeshadow first if you’re nervous about committing with liner.
Is this look appropriate for daytime events?
The full intensity is definitely evening-focused, but you can adapt elements for day. Try softer browns instead of blacks, skip the dramatic highlight, or do a bold eye with a nude lip. The techniques remain the same—just adjust the intensity level.
How do I remove all this makeup without damaging my skin?
Double cleanse always. Start with an oil-based cleanser to break down the makeup, then follow with a gentle water-based cleanser. Take your time—aggressive rubbing can irritate your skin. Use separate eye makeup remover for the dramatic eye look since it’s the most stubborn to remove.
The result? After weeks of practicing this technique, I finally achieved that sharp, sculpted baddie look I’d been chasing. More importantly, I understood the principles behind each step, which made adapting the look for different occasions much easier. The precision becomes muscle memory with practice, and honestly, there’s something incredibly satisfying about creating such a structured, intentional makeup look.